Showing posts with label Procedure. Show all posts

Tuesday, April 12, 2011

Hot Bolting Procedure

  1. METHODOLOGY
When contemplating hot bolting a number of factors need to be considered. These include, but are not limited to:
·         Working procedures and guidelines
·         The piping system and the system's operating pressures and temperatures
·         Flange joints considered for hot bolting should have a minimum of 8 (eight) bolts. The bolt material should have a minimum strength equal to or greater than grades B7/2H
·         Prior to the commencement of work, the supervisor should review the maintenance history of the joint under consideration, and any joints of a similar type which have been hot bolted in the past.
·         The supervisor should also carry out a visual assessment of the joint. Hot bolting should not be carried out on joints which show significant signs of corrosion or necking, or which have worn or cracked threads on the fasteners
·         Hot bolting should only be attempted under operating conditions when the history of the flange assembly is known, i.e. records exist for the bolt load
·         The consequences of joint leakage during hot bolting should be considered (for example, toxicity, flammability and temperature of escaping fluids) and all necessary precautions taken. Contingency plans should also be put in place for an escape or emergency, e.g. means of communications and provision of standby equipment
·         Pipework within the vicinity of the joint to be hot bolted should also be reviewed. Pipe supports for the local section should be checked to ascertain whether they are taking the load on the pipe, along with their overall condition. If the pipework displays any significant signs of vibration around the specific flange, then hot bolting should not be considered as an option
·         The site supervisor shall check that all the necessary personnel, materials and equipment are at the worksite
·         Each bolt shall be checked for tightness, with any abnormal conditions, such as loose bolts, reported to the supervisor
·         Carry out hot bolting on one bolt at a time in accordance with the operator's correct sequence
·         Remove, examine, clean and lubricate each bolt, complete with nuts, for reuse. Any damaged bolts or nuts shall be disposed of and replaced with new items to the correct piping specification. If there is any doubt, the materials shall be replaced. All exposed flange surfaces must be cleaned and the area under the nuts lubricated
Note: Bolt cutting by any hot methods, including burning and grinding, is not usually permitted during hot bolting operations. Any cold bolt cutting, including hydraulic nut splitting, is usually only permitted by specific approval of the relevant authority
·         Ensure that the bolt has been correctly tightened before moving onto the next bolt in the sequence. Initial retightening of refitted bolts shall not introduce additional local compression of the gasket
·         After all the bolts have been replaced, a final tightness check shall be carried out again.
This work will be executed on flanges of live facilities, therefore in order to avoid potential risk of gas leakage rising through the flanges connection, the bolts shall be released and reinstated one by one. Sequence of bolts tightening arranged as such way to minimize the risk as defined in work steps hereafter.

Due to short length of existing bolt, torque wrench or hammer wrench will be used for bolting / unbolting. Prior to unbolting a complete check of all new bolts nuts (number + diameter + length + material) must be performed. Thread of existing bolts shall be cleaned up first from any dirt, paint or corrosion by means of paints removal and to be brushed by hand wire brush.

After one bolt has been released, then the all threads of bolt and nut shall be properly greased prior to reinstatement.

Monitoring gas leakage by gas detector shall be continuously conducted on the flanges during unbolting process, In case of gas detection, re-tighten immediately the concerned bolt and inform operators.

Unbolting and bolting shall be done according to the following steps :
1.              Using gas detector, ensure there is no gas leakage on flange connection on where hot bolting will be applied as well as existing facilities located close to the bolting area
2.              Smear the bolt no. 1 until the last bolt by paint removal and leave it for about 15 minutes
3.              Clean up the bolt by hand wire brush from dirt, paint or corrosion
4.              Install torque wrench or hammer wrench on the bolt
5.              Loosen the bolt’s nut just a little bit, then check this flange connection by gas detector if there is gas leakage ,especially at the position of bolt being loosened
6.              If the condition is safe, then continue unbolting process while monitoring by gas detector
7.              Grease all threads of bolt and nuts
8.              Reinstate the bolt and properly tighten it using torque wrench
9.              Mark the bolt that has been completed using marker
           10.     For hot bolting work, the bolts shall be released & reinstated one by one

Wednesday, April 6, 2011

Hot Bolting


Hot Bolting adalah pekerjaan yang dilakukan sebelum pekerjaan flange tie-in ataupun untuk memasang spade. tujuan pekerjaan ini adalah untuk mempermudah dan mempersingkat waktu ketika membuka baut sewaktu pelaksanaan tie-in. Methodenya yaitu membersihkan baut dari korosi maupun cat yang menempel di baut yang menyebabkan baut susah di buka. Untuk melunturkan cat/ korosi dipakai cairan WD-40. Baut yang dibuka, diganti dengan yang baru satu persatu sampai semuanya terganti.

Berikut methodologi/ procedurnya :


  1. METHODOLOGY
When contemplating hot bolting a number of factors need to be considered. These include, but are not limited to:
·         Working procedures and guidelines
·         The piping system and the system's operating pressures and temperatures
·         Flange joints considered for hot bolting should have a minimum of 8 (eight) bolts. The bolt material should have a minimum strength equal to or greater than grades B7/2H
·         Prior to the commencement of work, the supervisor should review the maintenance history of the joint under consideration, and any joints of a similar type which have been hot bolted in the past.
·         The supervisor should also carry out a visual assessment of the joint. Hot bolting should not be carried out on joints which show significant signs of corrosion or necking, or which have worn or cracked threads on the fasteners
·         Hot bolting should only be attempted under operating conditions when the history of the flange assembly is known, i.e. records exist for the bolt load
·         The consequences of joint leakage during hot bolting should be considered (for example, toxicity, flammability and temperature of escaping fluids) and all necessary precautions taken. Contingency plans should also be put in place for an escape or emergency, e.g. means of communications and provision of standby equipment
·         Pipework within the vicinity of the joint to be hot bolted should also be reviewed. Pipe supports for the local section should be checked to ascertain whether they are taking the load on the pipe, along with their overall condition. If the pipework displays any significant signs of vibration around the specific flange, then hot bolting should not be considered as an option
·         The site supervisor shall check that all the necessary personnel, materials and equipment are at the worksite
·         Each bolt shall be checked for tightness, with any abnormal conditions, such as loose bolts, reported to the supervisor
·         Carry out hot bolting on one bolt at a time in accordance with the operator's correct sequence
·         Remove, examine, clean and lubricate each bolt, complete with nuts, for reuse. Any damaged bolts or nuts shall be disposed of and replaced with new items to the correct piping specification. If there is any doubt, the materials shall be replaced. All exposed flange surfaces must be cleaned and the area under the nuts lubricated
Note: Bolt cutting by any hot methods, including burning and grinding, is not usually permitted during hot bolting operations. Any cold bolt cutting, including hydraulic nut splitting, is usually only permitted by specific approval of the relevant authority
·         Ensure that the bolt has been correctly tightened before moving onto the next bolt in the sequence. Initial retightening of refitted bolts shall not introduce additional local compression of the gasket
·         After all the bolts have been replaced, a final tightness check shall be carried out again.

This work will be executed on flanges of live facilities, therefore in order to avoid potential risk of gas leakage rising through the flanges connection, the bolts shall be released and reinstated one by one. Sequence of bolts tightening arranged as such way to minimize the risk as defined in work steps hereafter.

Due to short length of existing bolt, torque wrench or hammer wrench will be used for bolting / unbolting. Prior to unbolting a complete check of all new bolts nuts (number + diameter + length + material) must be performed. Thread of existing bolts shall be cleaned up first from any dirt, paint or corrosion by means of paints removal and to be brushed by hand wire brush.

After one bolt has been released, then the all threads of bolt and nut shall be properly greased prior to reinstatement.

Monitoring gas leakage by gas detector shall be continuously conducted on the flanges during unbolting process, In case of gas detection, re-tighten immediately the concerned bolt and inform operators.

Unbolting and bolting shall be done according to the following steps :
1.              Using gas detector, ensure there is no gas leakage on flange connection on where hot bolting will be applied as well as existing facilities located close to the bolting area
2.              Smear the bolt no. 1 until the last bolt by paint removal and leave it for about 15 minutes
3.              Clean up the bolt by hand wire brush from dirt, paint or corrosion
4.              Install torque wrench or hammer wrench on the bolt
5.              Loosen the bolt’s nut just a little bit, then check this flange connection by gas detector if there is gas leakage ,especially at the position of bolt being loosened
6.              If the condition is safe, then continue unbolting process while monitoring by gas detector
7.              Grease all threads of bolt and nuts
8.              Reinstate the bolt and properly tighten it using torque wrench
9.              Mark the bolt that has been completed using marker
            10.      For hot bolting work, the bolts shall be released & reinstated one by one

Tuesday, April 5, 2011

Gross Leak Test Procedure

Gross Leak test adalah pekerjaan yang dilakukan untuk melakukan test kebocoran pada sambungan flange. Pekerjaan ini dilakukan setelah selesai pelaksanaan hydrotest, setelah hydrotest semua spool selanjutnya masing2 pipa spool dirangkai menjadi satu kesatuan menjadi line service yang utuh. Ketika proses penyambungan antara flange dimungkinkan ada kebocoran pada gasket, inilah tujuan dari gross leak test. Gross leak test menggunakan media udara dari kompresor untuk nantinya diinject kedalam line pipa yang sudah siap. Selotip kertas ditempelkan pada masing2 sambungan dan diberi lubang dengan jarum untuk nantinya disemprot dengan air sabun sehingga dapat mengetahui apakah sambungan tersebut bocor atau tidak (dengan timbulnya gelembung berarti bocor). Pressurenya cukup 7 bar atau lebih kecil apabila tekanan operasi dari pipa kurang dari 7 bar.

Skecth Schematic Gross Leak

BERIKUT ADALAH PROCEDURE/ SEQUENCE DARI GROSS LEAK TEST :

GROSS LEAK methodology

a.   Follow test packs with Mark up PID's and sketches showing test limits line-up & isolations.

b.   Line up the system to be tested (all system isolation fitted, all port of system connected, safety valve operational and all instrument opened, drain valve closed, etc.)

c.   Prepare and assemble the gross leak system and ensure all port connection are tied in good condition.

d.   Install tape to flange joint connection & make small hole to check with soap during test.  

e.   Pressurize the sub-system line to 7 barg (or below if the maximum operating pressure of the sub system is lower) by using air.

f.    Test result shall be carried out by visual inspection using soapy water and test pressure measured by calibrated pressure gauges..

g.   A certified calibrated BARTON recorder will be installed.

h.   Observe and Commence checking flanges, valve gland packing, vent plugs, etc., for identification of leaks using soap solution. Pull-up flange bolts, etc., as required. If necessary, change gaskets or packing (after de-pressuring the system).

Do not attempt to tighten any leak with the system under pressure (pressurize the system first)

i.    The test will be continued for at least 1 hour, preferably during daytime when ambient temperatures are relatively steady. Pressurizing shall be hold until all the sub system line are inspected and accepted by CTR QA/QC and CPY Authorized Commissioning Teams.

j.    Following a successful test, de-pressure and reinstate the sub-system line by remove temporary blinds (if any), reinstall all the removed items which were required by sub-system, reposition of permanent spectacle blinds, including all others necessary works.

Piping Hydrotest Procedure

Hydrotest adalah pekerjaan yang dilakukan dengan cara memberi tekanan/ pressure pada rangkaian pipa yang sudah selesai dikerjakan oleh team konstruksi. Tujuan dari pekerjaan ini adalah untuk mengecek/ test material yang dipakai maupun hasil dari pengelasan apakah masih tahan terhadap tekanan sesuai dengan tekanan sewaktu operasinal nantinya. Sebelum pekerjaan hydrotest terlebih dahulu dilakukan flushing untuk membersihkan bagian dalam rangkaian pipa dari kotoran, debu dan sisa2 las2an hasil pekerjaan pengelasan.

Hydrotest Photo

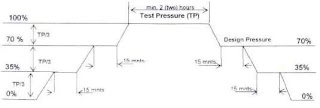
Hydrotest Chart


Sample Hydrotest Schematic


Berikut ini adalah inti dari procedure/ tata cara (selain daftar isi, referensi dokumen, safety, daftar peralatan, dan lain2) kerja untuk pekerjaan hydrotest :

  1. HYDRO TESTING
1.1 Hydro test preparation
Ready for inspection (RFI) notification shall be informed by construction supervisor to quality assurance/quality control (QA/QC) department when a piping system is ready for testing. Verification of all materials, test and mill certificates etc. are compiled and documented by QA/QC department and traceable for each component, fitting and pipe applied to each spool or line number. All required non-destructive examination (NDE) results shall be verified to conform to Company general specifications prior perform hydrotest.

The contractor’s QC inspector and Company representative shall together check visually in detail for the piping network prior to test. The checking shall include of:
·          Compliance with drawing and battery limit of related subsystem
·          Welded or flanged joints
·          Secure and correct bolting
·          Pipe routing and slope
·          Location of vent and/or drains
·          Pipe support, permanent and/or temporary
·          Temporary spading or blinding
·          Pipe painting and color coding

The piping supervisor will be responsible for conducting preparation and execution of pressure test and shall take coordination with QC inspector. Additional material for close the spools such as blind flange shall be available on test site and tighten properly prior hydro test (check correct rating).

Pressure gauges and recorder shall be in Bar or Psi unit. Temperature indicator shall be in degree Celcius. Full gauge range (indicated span) of pressure test gauges are to be selected in such a way that the test pressure will be in between 50% to 80% of the full range. A minimum of 2 (two) pressure gauges shall be required for the test. The gauges shall be installed at predetermined locations with one at the highest elevation point and one at the lowest elevation point wherever possible.

A certified pressure/temperature recorder (maximum validity of pressure equipment calibration 6 months) with full range in steps shall be used to record the test pressure, temperature and duration of testing. All relevant details are to be entered in onto the chart. Recorded to be used shall be of dual pen. All gauges and recorder shall be calibrated prior to utilization for test. Any indicator showing an unrecoverable zero error or error more than plus or minus 1.0% of full scale range shall not be used without repair and re-calibration. One temperature indicator recorder shall be provided.

1.2. Hydrotest Execution
Test manifold shall be assembled onto the piping network for connection to pressure gauges and recorder. Temperature indicator and pressure source connection. Sufficient valves shall be provided to allow blocking or releasing pressure.

For hydrostatic test, the pressure is applied by means of a suitable test pump (hydrotest pump shall be equipped with PSV as safety devices if used during pressure test) and gradually built up to 35% of the test pressure and held for at least 15 minutes to uniform stress along the piping network. Pressure then shall be applied until 70% of test pressure and, again, held for 15 minutes. Thereafter, once the required pressure reaches (1.5 design pressure) test pressure, piping network shall be isolated from the pressure source.


The test pressure shall be maintained 2 hours for holding time as per Company specification However this holding time can be prolonged to allow sufficient time for inspection. QC Inspector and Company representative shall carry out a detailed inspection of weld joints and connections for any leak, attention shall also be paid for dislocation or movement of the supports or distortion.

In case of pressure test is performed in the sunny day, the pressure gauge and temperature indicator shall be monitored to prevent undue pressure increase due to thermal expansion In order to avoid excessive pressure the system may be depressurized down to the required test pressure.


1.3 Limit of Test Pressure
Hydrotest pressure shall be 1.5 times of design pressure and hydrotest pressure shall be indicated in the drawing, lower limit of the test pressure shall be not less than test pressure specified. Upper limit is 5% of the test pressure, if during hydrostatic test the test pressure increased by more than the upper limit, the test pressure shall be released or bleed off to the specified test pressure.

If during hydrostatic test the test pressure is decreased to a pressure lower than the specified test pressure and there is no evidence of leakage, the line shall be pressurized back to reach the specified test pressure and held for 2 (two) hours
1.4    Inspection During Hydrotest
Upon reaching the desired holding time, the test pressure shall be reduced to a pressure not less than the test pressure by QC Inspector and the Company representative shall be carry out visual examination at this pressure. Examination for leakage shall be performed by QC Inspector at all welding joints and connections

Leakage is not allowed at time of the required visual inspection, except for leakage that might occur at temporary test closures for those openings intended for welded connections and leakage from temporary seals (gaskets). Leakage and damages found during the test shall be repaired and rectified.  And retest shall be performed.

1.5    Pressure Release
After the pressure test, pressure shall be released at a rate so as not to endanger personnel or to damage equipment by drawing test medium off the line.  Pressure released slowly until the pressure drop to 70% then holding for 15 minutes, release again until pressure drop to 35% then holding for 15 minutes. Pressure released again until gauge shown 0 bar, all vent shall be opened before the system is drained and shall remain open during draining prevent pulling vacuum on the system.

1.6    Record
Pressure test chart shall be signed by authorized persons. The following information shall be added on to the chart:
·          Pressure & temperature ranges
·          date of test
·          identification of piping system tested (line and/or spool number)
·          weather condition
·          test pressure
·          test medium
·          result of testing
·          names and signatures of executor or supervisor, QC inspector and Company representative
The record and pressure chart will be included in the pre commissioning dossier.

  1. POST HYDROTEST DRYING
Upon completion of hydrostatic testing, CONTRACTOR shall de­water the pipeline. Contractor shall begin the drying operation only after all testing activities are complete and accepted by Company. Water shall be moved ahead or disposed of after de­pressurized. Blowing some dry air inside the pipe spool to ensure that inside pipe is completely drained. Close the spool with proper closure before continue to other process, which is painting or installation.

Tie-in Activity


Tie-in flange connection

Tie-in adalah pekerjaan penyambungan rangkaian pipa yang baru diinstall dengan pipa existing (pipa lama) yang salah satu pekerjaan beresiko tinggi di dalam pekerjaan konstruksi migas karena berhubungan dengan pipa existing yang masih bertekanan/ mengandung cairan/ gas. Waktu pelaksanaan tie-in bisa dengan shutdown partial (hanya line/ equipment yang berhubungan dengan line tersebut yang dimatikan/ diblock), total shutdown (semua proses dimatikan untuk pelaksanaan maintenance sekaligus) ataupun tie-in tanpa shutdown (hot-tap).

Cold Cutting with cold cut machine

 Sebelum proses pembukaan existing flange ataupun pemotongan pipa existing beberapa hal harus dipersiapkan bersama dengan pihak operator produksi (FO/ field operation) diantaranya adalah melakukan proses pembersihan minyak/ gas (oleh operator) dengan melakukan flushing (pembersihan dengan mengisi line existing dengan air sampai pipa existing bersih). Setelah itu titik2 flange yang berhubungan dengan tie-in point diisolasi/ diblock dengan menggunakan blind untuk menghindari adanya cairan/ gas yang masuk ketika proses tie-in (sebelum membuka baut existing biasanya dilakukan hot bolting/ mengganti/ melumasi baut existing dengan cairan supaya karat/ cat hilang sehingga baut mudah untuk dibuka).

Type2 tie-in antara lain : flange connection, buttweld (pengelasan kampuh), socket weld (pengelasan sock), koneksi ulir (treaded).

-   Flange connection : cara ini adalah yang paling simple, tie-in ke existing line biasanya dilakukan di existing flange (biasanya sudah disiapkan spare oleh pihak engineering ketika proses design proyek sebelumnya)  untuk menghindari pengelasan karena existing line mengandung gas/ cairan yang bisa mengakibatkan kebakaran. Existing flange yang sudah di pasang blind dibuka, flange existing dibersihkan dan disambung dengan flange rangkain pipa baru.
-   Weld conection (buttweld/ socket weld) : jika memang spare flange tidak ada di line existing, tie-in dapat dilakukan dengan proses welding, tentunya pipa existing yang akan disambung pipa baru dipotong dengan menggunakan proses cold cutting untuk menghindari berhubungan dengan panas/ api. Alat cold cutting bisa dengan manual (untuk pipa diameter kecil) ataupun dengan mesin cold cut (bisa sekaligus bevel). Setelah proses pemotongan, kondisi pipa yang terpotong dicek apakah masih terdapat  condensate di dalam pipa, jika masih ada pipa existing harus dibersihkan hingga kandungan gas/ minyak LEL= 0 bisanya diukur dengan alat pendeteksi gas. Pemasangan rubber plug diperlukan sebelum proses penggerindaan/ pengelasan untuk menghindari adanya cairan/ gas yang mengalir sehingga mengakibatkan terbakar.


Lifting activity

Beberapa pekerjaan yang berhubungan dengan tie-in seperti pekerjaan scaffolding/ perancah, pekerjaan lifting/ pengangkatan harus dipersiapkan sehingga pekerjaan tie-in dapat berjalan dengan lancar karena waktu untuk tie-in sangat dibatasi oleh pihak operator produksi karena berhubungan dengan di hentikannya proses produksi. Akan tetapi semua pekerjaan tersebut harus mengutamakan keselamatan/ sesuai dengan standard safety untuk menghindari kecelakaan.